Roof flashing might be small, but it plays a big role in keeping your home dry. In simple terms, flashing for roof systems helps direct water away from the spots where leaks are most likely to occur. When flashing wears out or fails, even a solid roof can start letting water in.
Many homeowners do not think about flashing until a stain appears on the ceiling or water shows up in the attic. Learn how roof flashing works, why it matters, and what inspectors check to protect your home.
Why Roof Flashing Is One of the Most Important Roof Components
Roof flashing protects the most vulnerable parts of a roof, including chimneys, vents, valleys, and roof-to-wall connections where water flow changes. Shingles shed water, while flashing directs it from gaps to drainage paths.
Industry data suggests that up to 80–90% of roof leaks originate at flashing locations and other roof penetrations, rather than in the main field of shingles. During home inspections, inspectors often trace moisture damage back to these areas, even when the rest of the roof appears to be in acceptable condition, which underscores the importance of properly installed and maintained flashing.
What Is Roof Flashing and What Does It Do?
Roof flashing is made from metal or durable synthetic materials and is installed at specific locations where water is more likely to slip beneath roofing materials. These areas typically include seams, transitions, and roof penetrations where different materials meet or where openings exist.
Unlike shingles, which are designed to shed water across the roof surface, flashing helps control and redirect water at vulnerable points. It uses the roof’s slope and water flow to limit moisture entry.
When roof leaks develop, they often require more than temporary fixes to prevent long-term structural damage.
Roof flashing is designed to:
- Guide water away from roof seams and joints
- Protect openings such as vents, chimneys, and skylights
- Prevent water from backing up under shingles or roofing materials
- Support proper drainage during heavy or wind-driven rain
Rather than acting as a standalone waterproof seal, flashing functions as a key part of the roof’s overall water management system. Proper installation and maintenance minimise leaks by directing water safely.
Where Flashing for Roof Systems Is Installed and Why These Areas Matter
Flashing is installed anywhere a roof has joints, transitions, or penetrations. These areas interrupt the natural flow of water across the roof surface and are more likely to allow moisture intrusion if not properly protected.
Common locations where flashing for roof systems is installed include:
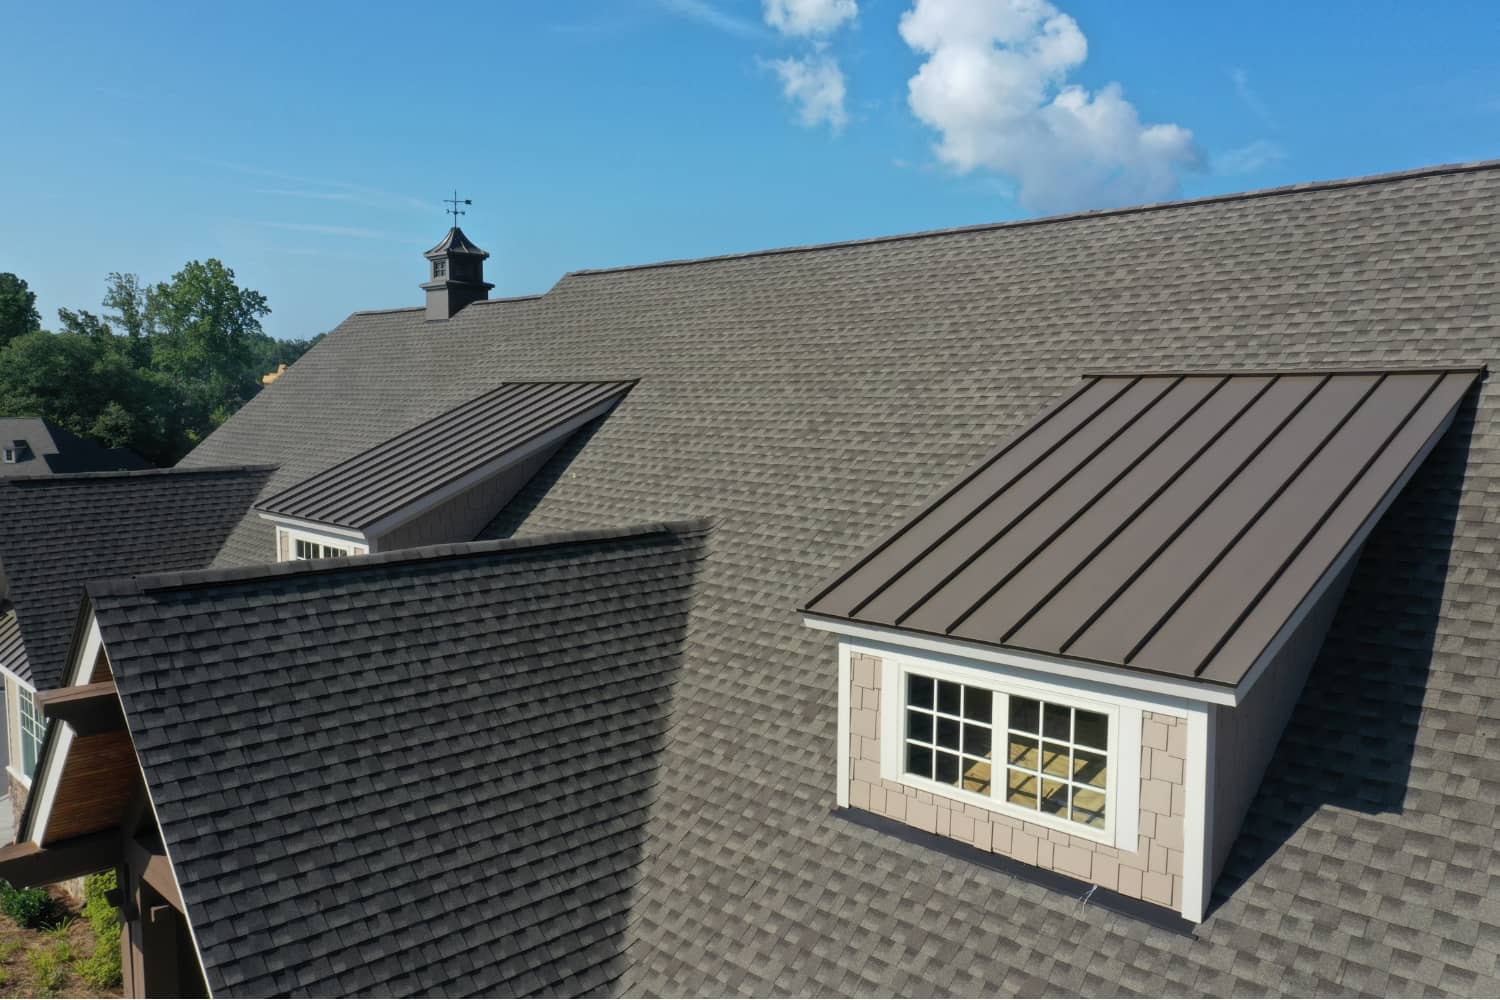
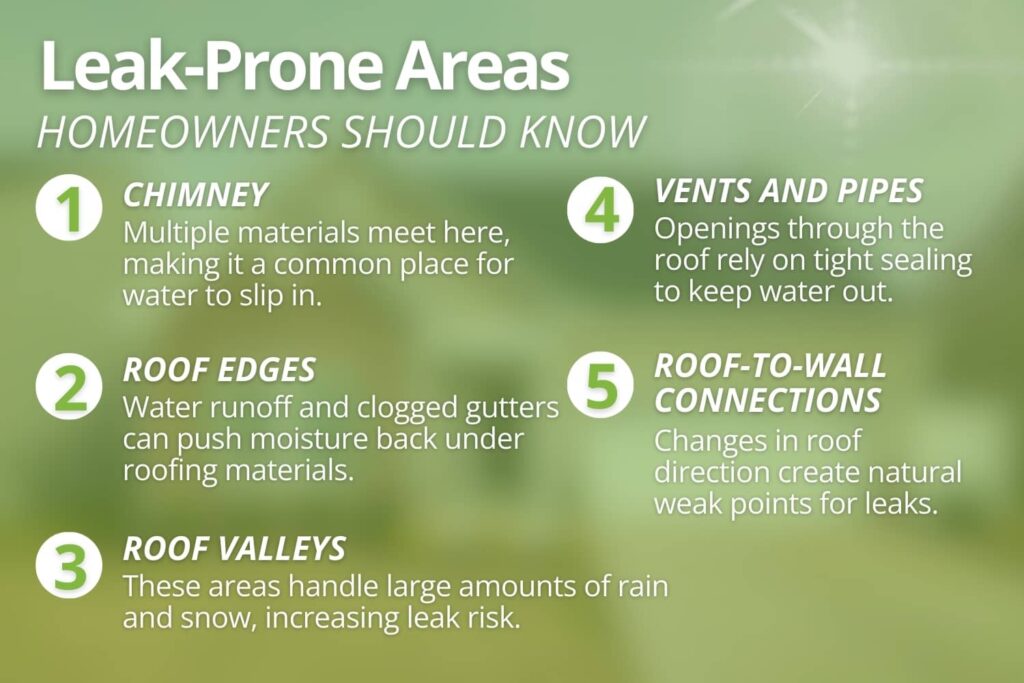
- Chimneys and masonry walls, where roofing materials meet vertical surfaces, and water can collect along seams
- Roof valleys, where two slopes meet, which handle large volumes of runoff during heavy rain
- Skylights and roof-mounted equipment, where openings are cut into the roof surface
- Plumbing vents and exhaust pipes, which penetrate the roof and require tight sealing around the base
- Roof-to-wall intersections, such as dormers or step-down roof sections, where layered flashing is needed
- Eaves and roof edges, where flashing helps direct water away from the roof and into gutters
These locations experience increased water exposure and more complex roof geometry, making them more vulnerable to leaks. Properly installed flashing helps manage water flow at these weak points and reduces the likelihood of moisture entering beneath roofing materials.
Identifying these vulnerable areas during a radon test or home inspection helps buyers understand potential maintenance needs before closing.
Types of Roof Flashing Homeowners Should Be Familiar With
Understanding the types of flashing referenced in a home inspection report can help homeowners better interpret findings and identify potential areas of concern.
While installation details are not necessary to know, recognizing the purpose of each type of flashing provides helpful context.
| Type of Roof Flashing | Where It Is Used and Why It Matters |
|---|---|
| Step flashing | Installed at roof-to-wall transitions to direct water away from vertical surfaces and prevent seepage behind siding or walls |
| Counter flashing | Placed over step flashing, often embedded in masonry, to provide an additional layer of protection against water intrusion |
| Valley flashing | Runs along roof valleys to manage high volumes of water where two roof slopes meet |
| Drip edge flashing | Installed along roof edges to protect the roof deck and guide water into the gutter system |
| Vent pipe flashing | Seals around plumbing vents and exhaust pipes where they penetrate the roof surface |
You do not need to know how to install these components, but being familiar with their names and purposes can make inspection reports easier to understand and help homeowners recognize areas that may need further attention.
Materials Used for Flashing for Roof Applications
Roof flashing is made from several common materials, each selected based on location, durability needs, and exposure to weather. Understanding the basic differences can help homeowners better interpret inspection findings and maintenance recommendations.
- Aluminum: Lightweight and naturally resistant to rust, aluminum flashing is widely used in many roof applications. It performs well in most climates but can bend or dent more easily than heavier metals.
- Galvanized steel: Known for its strength and durability, galvanized steel flashing is coated to resist corrosion. Over time, especially in areas with frequent moisture exposure, this coating can wear down and allow rust to form.
- Copper: Highly durable and long-lasting, copper flashing resists corrosion and can perform well for decades. It is often found on older homes or higher-end installations and may develop a natural patina as it ages.
- Rubber or composite materials: Commonly used for vent pipe boots and roof penetrations, these materials provide flexibility and a tight seal. However, they may degrade faster than metal flashing when exposed to prolonged sunlight and temperature changes.
The material used for flashing affects its expected lifespan and its ability to withstand weather conditions. During a home inspection, the condition of these materials helps determine whether flashing is likely performing as intended or showing signs of wear.
Common Flashing for Roof Problems Found During Home Inspections
During a home inspection, flashing issues are among the most frequently noted roof-related findings. Because flashing is installed at transition points and penetrations, even small defects can increase the risk of moisture intrusion over time.
Common flashing problems identified during inspections include:
- Missing flashing at critical junctions, such as roof-to-wall connections or around chimneys, which leaves gaps where water can enter the structure
- Improper installation or layering under shingles, where flashing is not integrated correctly with roofing materials, and allows water to flow behind it instead of away from the roof
- Rusted, cracked, or corroded metal, often caused by age, prolonged moisture exposure, or incompatible materials
- Loose or lifted flashing sections, which can occur due to wind, thermal movement, or inadequate fastening
- Heavy reliance on sealant instead of proper flashing, where caulking is used as a primary fix rather than as a supplemental measure
While sealant can temporarily slow water entry, it is not a long-term solution on its own. Over time, caulking can dry out, shrink, or crack due to weather exposure and temperature changes, allowing water intrusion to return and potentially cause hidden damage beneath the roofing materials.
Warning Signs Flashing for Roof Areas May Be Failing
Flashing problems often become noticeable inside the home before any damage is visible on the roof itself. Because water can travel along framing and surfaces, the source of a problem may be higher or farther away than it first appears.
Common warning signs that flashing for roof areas may be failing include:
- Water stains on ceilings or walls, especially near exterior walls or chimneys
- Moisture, dark staining, or damp insulation in attic spaces, which may indicate slow or ongoing water intrusion
- Mold or mildew near roof penetrations, such as vents, skylights, or attic access points
- Dripping or leaking during heavy rain or wind-driven storms, when water is pushed under flashing edges
- Visible gaps, rust, or lifting at flashing edges, which can allow water to bypass roofing materials
These signs do not always confirm a flashing failure on their own, but they should not be ignored. Even if the roof looks fine from the ground, these signs may warrant further evaluation to prevent further damage.
How Home Inspectors Evaluate Roof Flashing
During a roof inspection, home inspectors evaluate flashing through a careful visual assessment of accessible areas. They look for visible signs of damage such as corrosion, cracking, or bending, and assess whether flashing appears to be properly placed and layered with surrounding roofing materials.
Inspectors also note gaps, loose sections, or areas where flashing may have shifted, as well as evidence of past repairs that could indicate recurring moisture concerns.
It is important to understand that home inspections are non-invasive by design. Inspectors do not remove shingles, siding, or flashing components, which means some issues may remain hidden from view at the time of inspection.
When conditions suggest potential concerns beyond what can be visually confirmed, inspectors may recommend further evaluation to help determine the extent of the issue and whether additional repairs are needed.
What a Home Inspection Cannot Determine About Roof Flashing
A home inspection provides important insight into the visible condition of roof flashing, but it also has clear limitations. Because inspections are visual and non-invasive, certain conditions cannot be confirmed at the time of the inspection.
There are limits to what a home inspection can show, including:
- Hidden flashing behind siding or masonry, where flashing may be concealed and inaccessible without removing materials
- The remaining useful life of flashing materials, since age, exposure, and past repairs can affect longevity in ways that are not visible
- Flashing performance in extreme weather conditions, such as heavy rain, ice buildup, or wind-driven storms, that do not occur during the inspection
- Internal structural damage behind visible signs, where moisture may have affected framing or sheathing without obvious surface indicators
When inspectors note concerns beyond what can be visually confirmed, they may recommend further evaluation by a licensed roofing professional. Just as with radon testing, some of the most important risks to a home’s safety and comfort are not visible during a standard visual inspection.
Flashing for Roof Issues in Real Estate Transactions
Flashing conditions can play an important role in real estate transactions because they relate directly to water intrusion and long-term property protection.
When flashing issues are identified during a home inspection, buyers may request repairs, credits, or additional evaluation to better understand the potential risk. These findings can influence negotiations, especially if moisture damage or active leaks are present.
Sellers often choose to address known flashing issues before listing a home to help prevent delays or last-minute concerns. In some cases, lenders or insurers may require proof of repairs, and identifying flashing issues early helps support smoother negotiations and fewer last-minute costs.
When Flashing for Roof Systems Should Be Repaired or Replaced
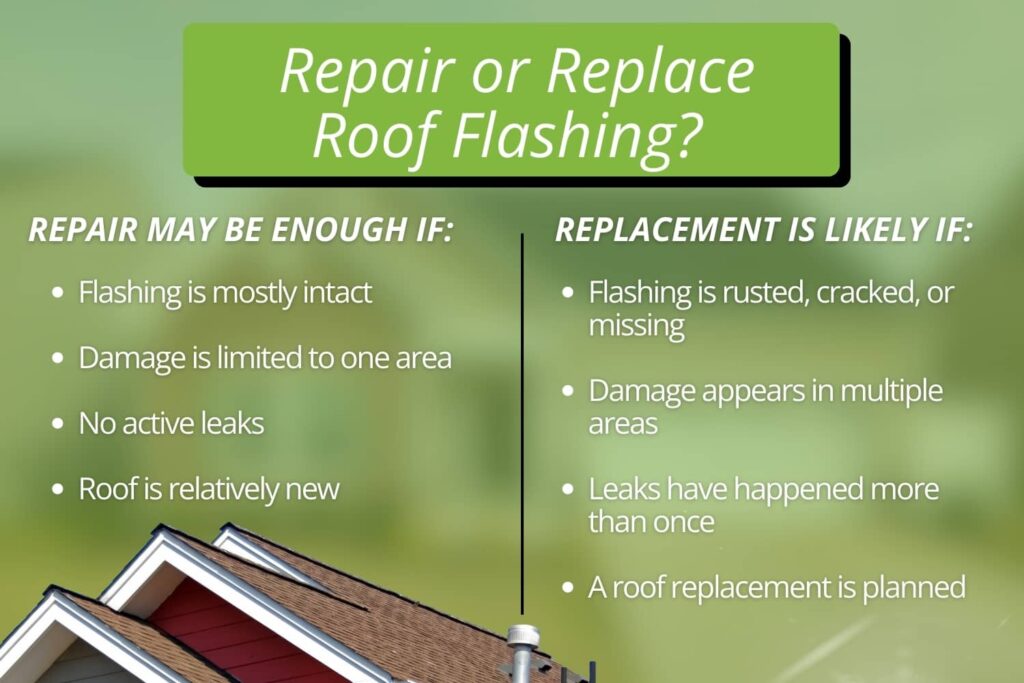
Not every flashing issue requires full replacement. In some cases, minor concerns such as small gaps, loose edges, or isolated damage may be addressed through targeted repairs. These situations are more common when flashing is relatively new, and the surrounding roofing materials remain in good condition.
Replacement is often recommended when flashing shows widespread deterioration, corrosion, cracking, or repeated signs of leakage. Flashing that is nearing the end of its expected lifespan may also be better replaced than repeatedly repaired.
Coordinating flashing replacement with a roof replacement is often more efficient and cost-effective. Age, weather exposure, installation quality, and material type influence when repairs or replacement are needed.
Preventive Maintenance Tips for Flashing for Roof Longevity
While roof flashing is designed to be durable, regular observation and basic maintenance can help extend its lifespan and reduce the risk of unexpected leaks. Homeowners do not need to access the roof to stay aware of potential issues.
Simple steps that can help protect flashing for roof longevity include:
- Inspect from the ground after storms, looking for lifted metal, displaced flashing, or visible changes near chimneys, vents, and roof edges
- Watch for interior moisture issues, such as ceiling stains, peeling paint, or damp attic insulation that may signal early water intrusion
- Keep gutters clear to avoid water backup, as clogged gutters can force water under flashing and roofing materials
- Schedule regular inspections with a professional, especially before buying, selling, or after severe weather events
Addressing small flashing issues early helps prevent larger moisture problems and costly repairs.
How Proper Flashing for Roof Systems Helps Prevent Long-Term Damage
Properly installed flashing protects more than the roof surface by directing water away from vulnerable areas.
Effective flashing helps prevent long-term issues such as:
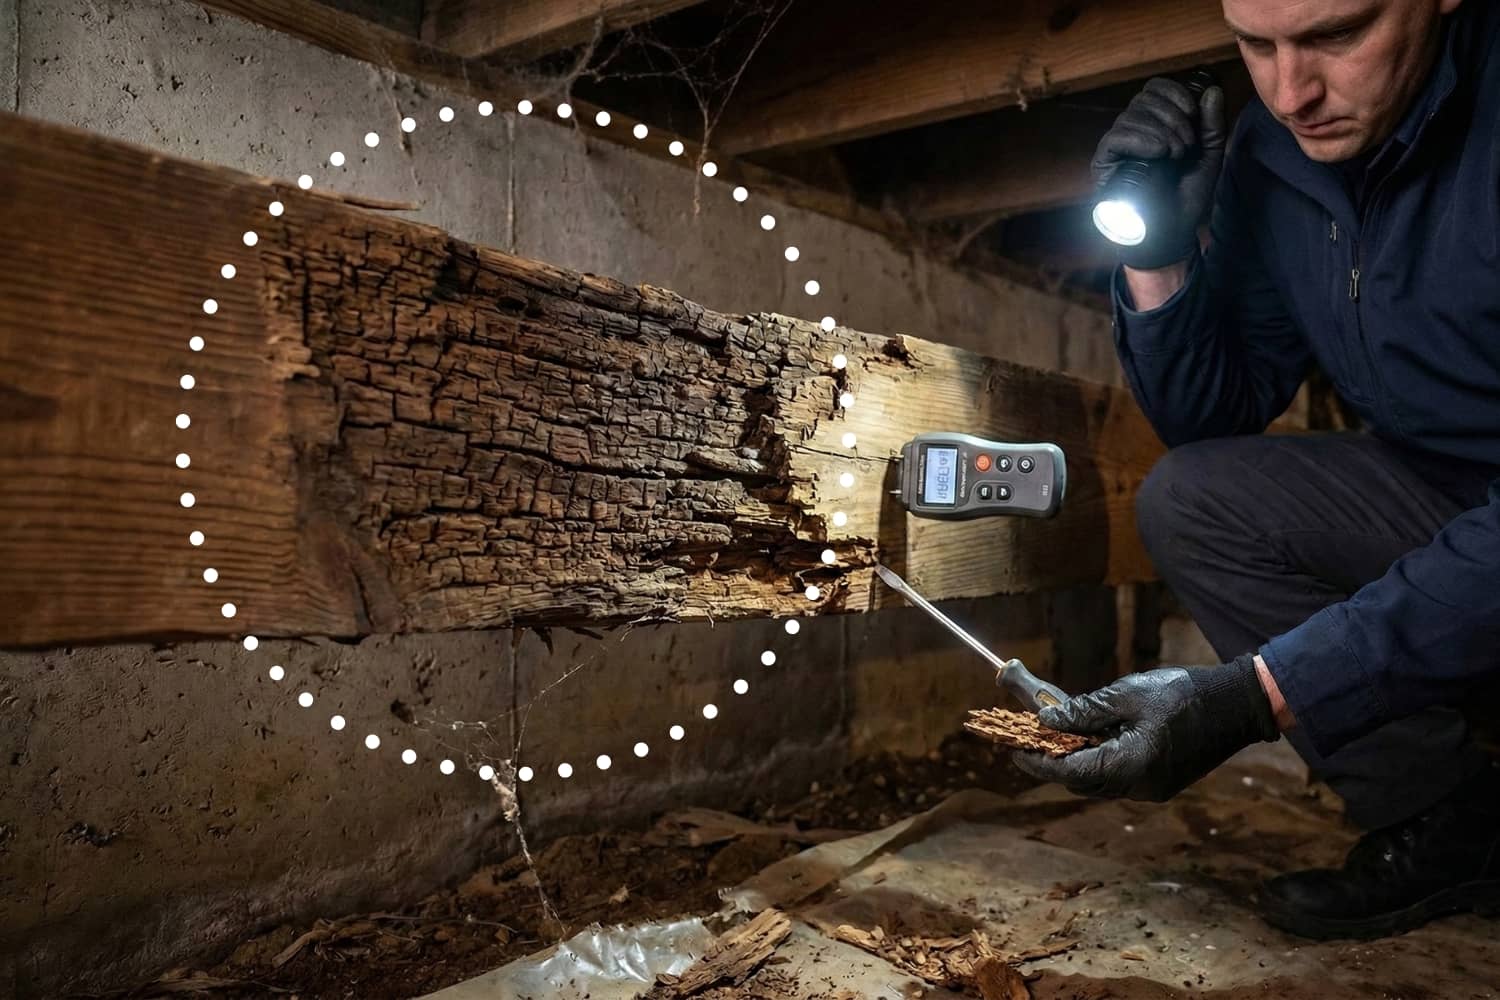
- Structural wood rot, which can weaken roof framing, wall studs, and roof decking over time, may contribute to conditions that attract wood-destroying insects
- Mold or mildew growth, often caused by ongoing moisture in attics, wall cavities, or ceiling spaces
- Insulation damage, where wet insulation loses effectiveness and may contribute to higher energy costs
- Interior ceiling and wall damage, including stains, bubbling paint, and deteriorating drywall
Because moisture-related damage often develops slowly, problems tied to flashing can go unnoticed for long periods. Addressing flashing issues early is usually less disruptive and less costly than repairing hidden water damage later.
Related Questions
Do home inspections include flashing for roof evaluations?
Yes. Inspectors visually review accessible roof flashing as part of a standard home inspection and document what they can see from safe, non-invasive vantage points. They note visible issues such as corrosion, gaps, movement, or improper installation, while understanding that concealed flashing cannot be fully evaluated without removing materials.
Can poor flashing installation cause mold inside the home?
Yes. When flashing fails and water enters the home over time, moisture can lead to mold growth in attics and walls. Mold not only damages materials but can also pose health concerns, so early detection matters.
What can a professional home inspection tell me about the condition of my roof?
A professional home inspection provides an overview of visible roof conditions, including shingles, flashing, drainage, and early warning signs of potential leaks or moisture damage.
Conlusion
Roof flashing protects a home from water intrusion, and minor issues can cause major problems if ignored. Understanding how flashing works and recognizing early warning signs helps homeowners make informed decisions about maintenance and repairs.
A professional home inspection can help identify visible flashing concerns as part of a broader roof evaluation. NISI serves homeowners throughout Evansville and nearby communities, providing clear, objective insights that support confident decisions whether you are buying, selling, or maintaining a home.